You have a lot of videos on your website and would like to organize them so that they can be easily searched? What you need is a video gallery. While it is certainly easy to make videos a part of the posts you publish on your blog, WordPress itself isn’t exactly a video-oriented platform.
Therefore, creating a list of videos may pose a problem. But never fear, plugins are here – there are plenty of plugins out there that allow you to create a video gallery, and with this short guide, you will learn how to do that in a flash. Let’s go.
Envira Gallery

Step 1: Install your Envira Gallery plugin
Obviously, you can use any video gallery plugin for this, but we decided to go with Envira Gallery. It is a highly respected product of great quality, and using it is quite a pleasure thanks to the numerous features it offers.
However, do keep in mind that the plugin isn’t free, which is certainly a piece of information worth considering. If you do decide to go with Envira Gallery, you will have to input your license key after you activate the plugin. You can do that on the Settings page, and the key is available to you on the plugin’s official website.
Step 2: Install and activate Videos addon
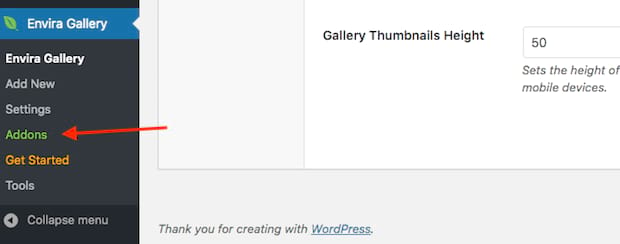
Next, go to the addons page (you’re doing all of this from your WP admin profile). Find the Videos addon and click the “Install” button. Once the installation is complete, click the “Activate” button. Now you’re ready to start working on your video gallery.

Step 3: Create a new gallery
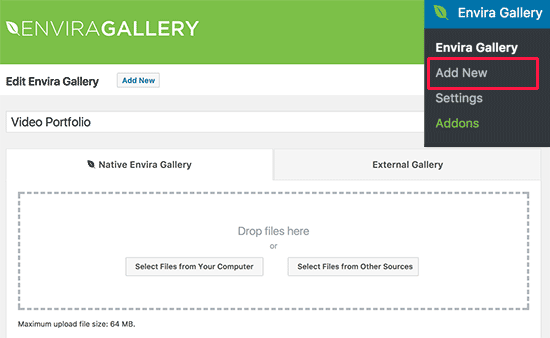
Clicking on “Add New” will initiate the process of creating a new gallery and will also bring you to the screen where you can first name your gallery (the top field) and then proceed to add videos to it.
After choosing the name, you have two choices: you can click on “Select Files from Your Computer” or on “Select Files from Other Sources”. The latter option means importing videos from platforms such as YouTube or Vimeo, which can be beneficial to you because you won’t have to host videos yourself.

By clicking on this, a new window will appear where you will input the video’s name and URL. You can add and/or remove as many videos you want this way, and once you’re done, just click on the “Insert into Gallery” button and they will appear there.
Step 4: Configuring your gallery
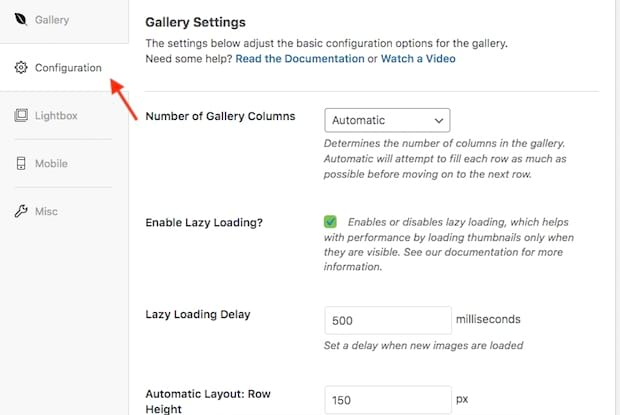
Once you have your videos uploaded to the gallery, you may want to think about configuring the whole thing so that it looks much more pleasing to your visitors. Head to the “Config” tab in Gallery Settings to see available options.
You can choose the number of columns (two or three is usually recommended), enable lazy loading, and adjust a few other things.

A bit further down on the left side of your screen in Gallery Settings, you will notice the Videos tab where you can decide whether or not you want them to play automatically, if a Play Icon will be over the thumbnail image, or if you want videos to automatically cover the full screen.
Once you’re done, just click on “Publish” and the gallery will be ready for you to put it on display
Step 5: Displaying your gallery
Now, whenever you want to show your gallery to your visitors, you will have to add it to the page or the post you’re creating. You will now see that there is an “Add Gallery” button next to the “Add Media” option, and clicking on that will bring up the screen on which you can choose the gallery you want to display. Just click “Insert”, and you will have exciting new content on your website.

Apart from making a gallery visible in any post and on any page of your website, you can also choose to show it as a sidebar. Therefore, you have more than enough options to make sure the gallery fits seamlessly into your overall design.
And that’s pretty much it. Not too complicated, is it? Obviously, Envira is not the only option out there, so let’s take a look and a few other options that could get you similar results. While the execution may be a tad different, the main principle remains the same: create a gallery, name it, and add videos to it, preferably from other video platforms to save you some hosting space.
Other good video gallery plugins
1. Gallery Box

Gallery Box is a very good solution for creating all sorts of galleries, not just those that contain videos. First of all, you can choose between the free and the pro version, which will certainly appeal to many potential users.
As far as the features are concerned, you can create YouTube and Vimeo galleries, but also Soundcloud audio galleries and image galleries if you so desire. Lightbox will take care of playing both audio and video files, so you’re pretty well covered there, as well.
But a very appealing aspect of this plugin is the abundance of pretty interesting and attractive design options. The various hover effects on offer are definitely something that is bound to draw the attention of your visitors. On top of that, the plugin is very easy to use, so you should be able to set everything up in no time at all.
2. YouTube Gallery

Another excellent plugin for creating video galleries in WordPress. YouTube Gallery is widely recommended by the community. One thing that makes it different from other similar pieces of software is the fact that you will have to get an API key to use it. You can find that on your Google Developer Console.
With this plugin, YouTube serves as an HTML5 player, which can come in very handy if somebody is viewing your content from a device that doesn’t have Flash. On top of that, you can use it both as a widget or as a shortcode, whatever suits you better.
Another interesting thing to note is the fact that you can use the plugin several times on the same page, which can really add value to it and improve the user experience. So, if YouTube is your main source of videos or you have a channel there, this is the plugin you’ll definitely want to consider.
3. Vimeography

On the other hand, if you’re more of a Vimeo kind of person, Vimeography is the plugin for you. It’s very easy to use and you can actually create a gallery within a minute or so, but at the same time, there are quite a few options to consider when it comes to customization.
You can edit the layout of the gallery, but also its size to make sure it fits perfectly on your page/post. You can also adjust its theme, even pixel count, so when it comes to design and the appearance of your pages, you don’t have to worry one bit.
Other interesting features include things like the option to automatically add videos and the fact that a special caching system is also here to enable faster loading.
It is a free plugin, but it also has a premium version if you decide you want to expand on your options a bit.
4. Huzzaz Video Gallery

Last but not least, we would like to mention Huzzaz Video Gallery. Now, this plugin can help you create some really good-looking, crisp video galleries, and it supports both YouTube and Vimeo channels.
The galleries are searchable, and the drag-and-drop interface makes creating things nice and simple, not to mention the fact that you can show your gallery pretty much wherever you want on your site. Other interesting options include the fact that you can choose for your video gallery to pop up, and that your video can be minimized and can float whenever a user scrolls past it.
The plugin will work on all devices, and you really won’t regret giving it a chance. Simply put, it’s really good.
Conclusion
Creating a video gallery and making it a part of your website really isn’t rocket science. In just a few steps, everything can be up and running, and after a while, you will be able to create these things in a matter of minutes, or less if there’s just one video involved.
It’s an ideal way to connect with your YouTube or Vimeo channel if you have one and maximize your reach. And if you don’t have one, you should still utilize these platforms because it’s always better to embed a video from them than to upload something from your computer. It saves you a lot of space on your hosting server.
As you can see from the article, there are plenty of fine choices for this particular purpose, so do your research and see which fits you best. You will be getting a tool that will help your site a lot.
